
Reverse Engineering the YC Directory
◦
views

Ray Arayilakath
If you happen to have an interest in working at a startup, you may have come across Y Combinator’s Work at a Startup, a great way to find information about startups that are currently hiring.
In the process of building a search agent for my next internship I became rather frustrated with the lack of an easy way to get data about YC companies, so I could build tooling to generate leads. I found a few Python packages but they all used Selenium and BeautifulSoup to scrape the websites, an awful waste of resources. Curious to better understand how YC is actually getting this data, I decided to peek behind the curtain.
Step 1: Exploring the Network Requests
Since the data appeared on page load, I could determine it’s probably being fetched client-side. Opening up the network tab on Chrome DevTools and filtering by Fetch/XHR reveals some requests going out to Sentry (error tracking software), the Google Maps API (Google SDK initialization), and an Unleash feature flags endpoint on /unleash/proxy.
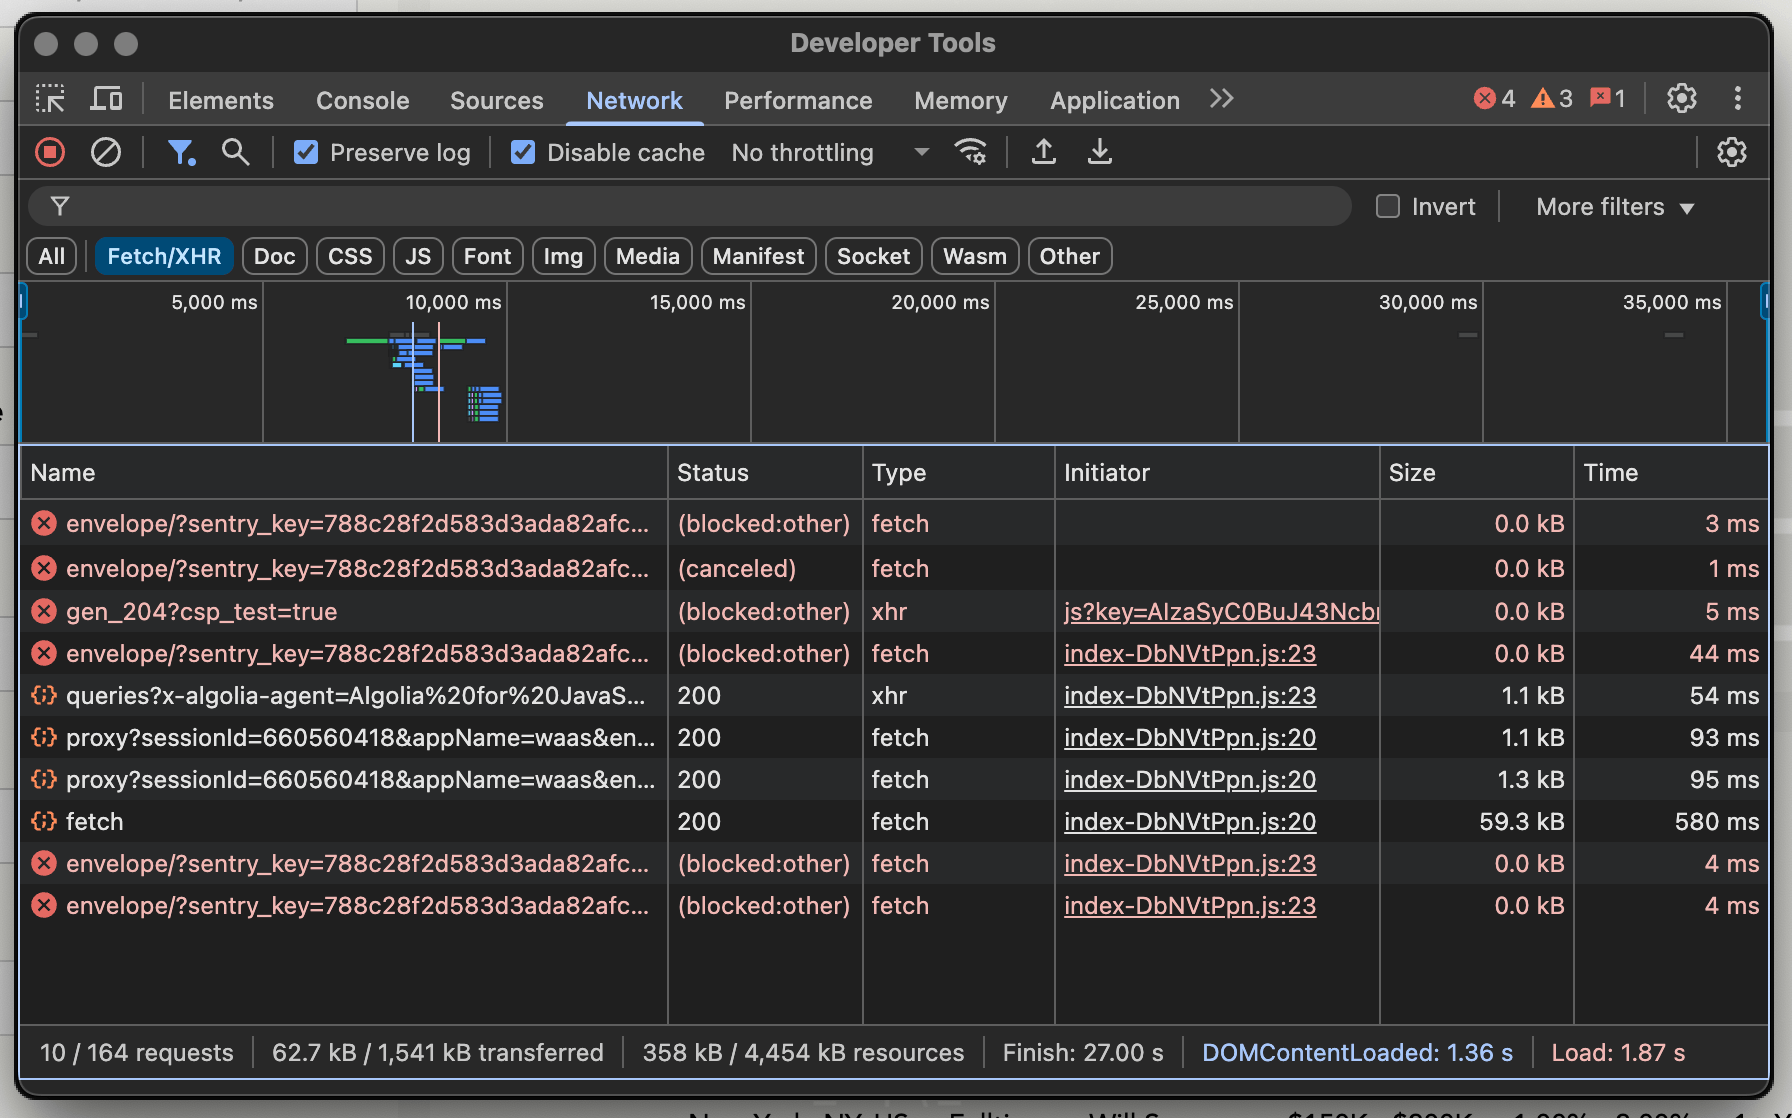
What’s most important here though are two requests sent out – one to https://45bwzj1sgc-dsn.algolia.net and another to https://workatastartup.com/companies/fetch! Great news, YC uses Algolia, a popular search infrastructure platform, to manage their job search index.
Step 2: Understanding the Algolia Query
YC sends structured JSON payloads to Algolia, specifying attributes such as roles, locations, and job types. I captured a sample payload and analyzed what it looks like:
{
  "requests": [
    {
      "indexName": "WaaSPublicCompanyJob_created_at_desc_production",
      "params": "query=&page=0&filters=&attributesToRetrieve=%5B%22company_id%22%5D&attributesToHighlight=%5B%5D&attributesToSnippet=%5B%5D&hitsPerPage=10&clickAnalytics=true&distinct=true"
    }
  ]
}
Simple enough, the name of the search index is WaaSPublicCompanyJob_created_at_desc_production and it specifies some parameters for pagination and to filter the search by. Seemingly, they use the Algolia Search SDK, as indicated in the search parameters of the request:
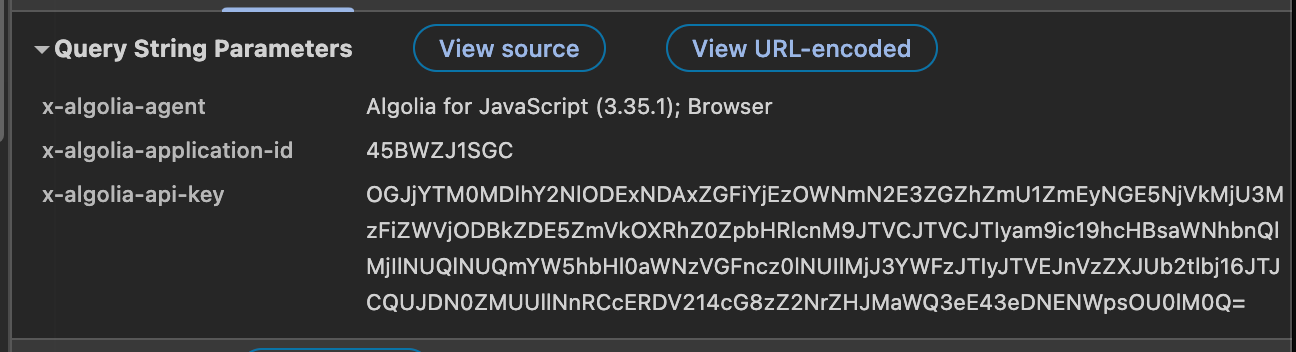
Oh lovely, an API key too! Not to worry, Algolia issues restricted API keys that are to be used on the client side, which this is one of. Lucky for us, we can also take this information and start querying their search index for our own purposes.
Step 3: Writing our own Queries
I decided to create a simple Bun script as a proof-of-concept for how feasible this is and to better poke at the API. Using Algolia in Bun is as simple as bun install @algolia/client-search and then instantiating a client.
import { searchClient } from "@algolia/client-search";

const ALGOLIA_APP_ID = "45BWZJ1SGC";
const ALGOLIA_API_KEY = "[API KEY FROM ABOVE]";
const INDEX_NAME = "WaaSPublicCompanyJob_created_at_desc_production";

const client = searchClient(ALGOLIA_APP_ID, ALGOLIA_API_KEY);
And then from there, all I would need to do is use the client to search the index. Thankfully, it handles building the query parameter for me and is typed so I don’t have to do too much work on that part.
const { hits } = await client.searchSingleIndex({
indexName: INDEX_NAME,
searchParams: {
query: "",
hitsPerPage: 100,
page: 0,
filters: [
"role:eng",
'locations_for_search:"San Francisco, CA, US"',
'job_type:"intern"',
].join(" AND "),
attributesToRetrieve: [
"company_name",
"company_website",
"title",
"locations_for_search",
"description",
],
},
});
const OUTPUT = "";
for (const hit of hits) {
OUTPUT += `## ${hit.company_name} (${hit.company_website})\n`;
OUTPUT += "\n";
OUTPUT += `- **Title**: ${hit.title}\n`;
OUTPUT += `- **Location**: ${hit.locations_for_search[2]}\n`;
OUTPUT += "\n";
}
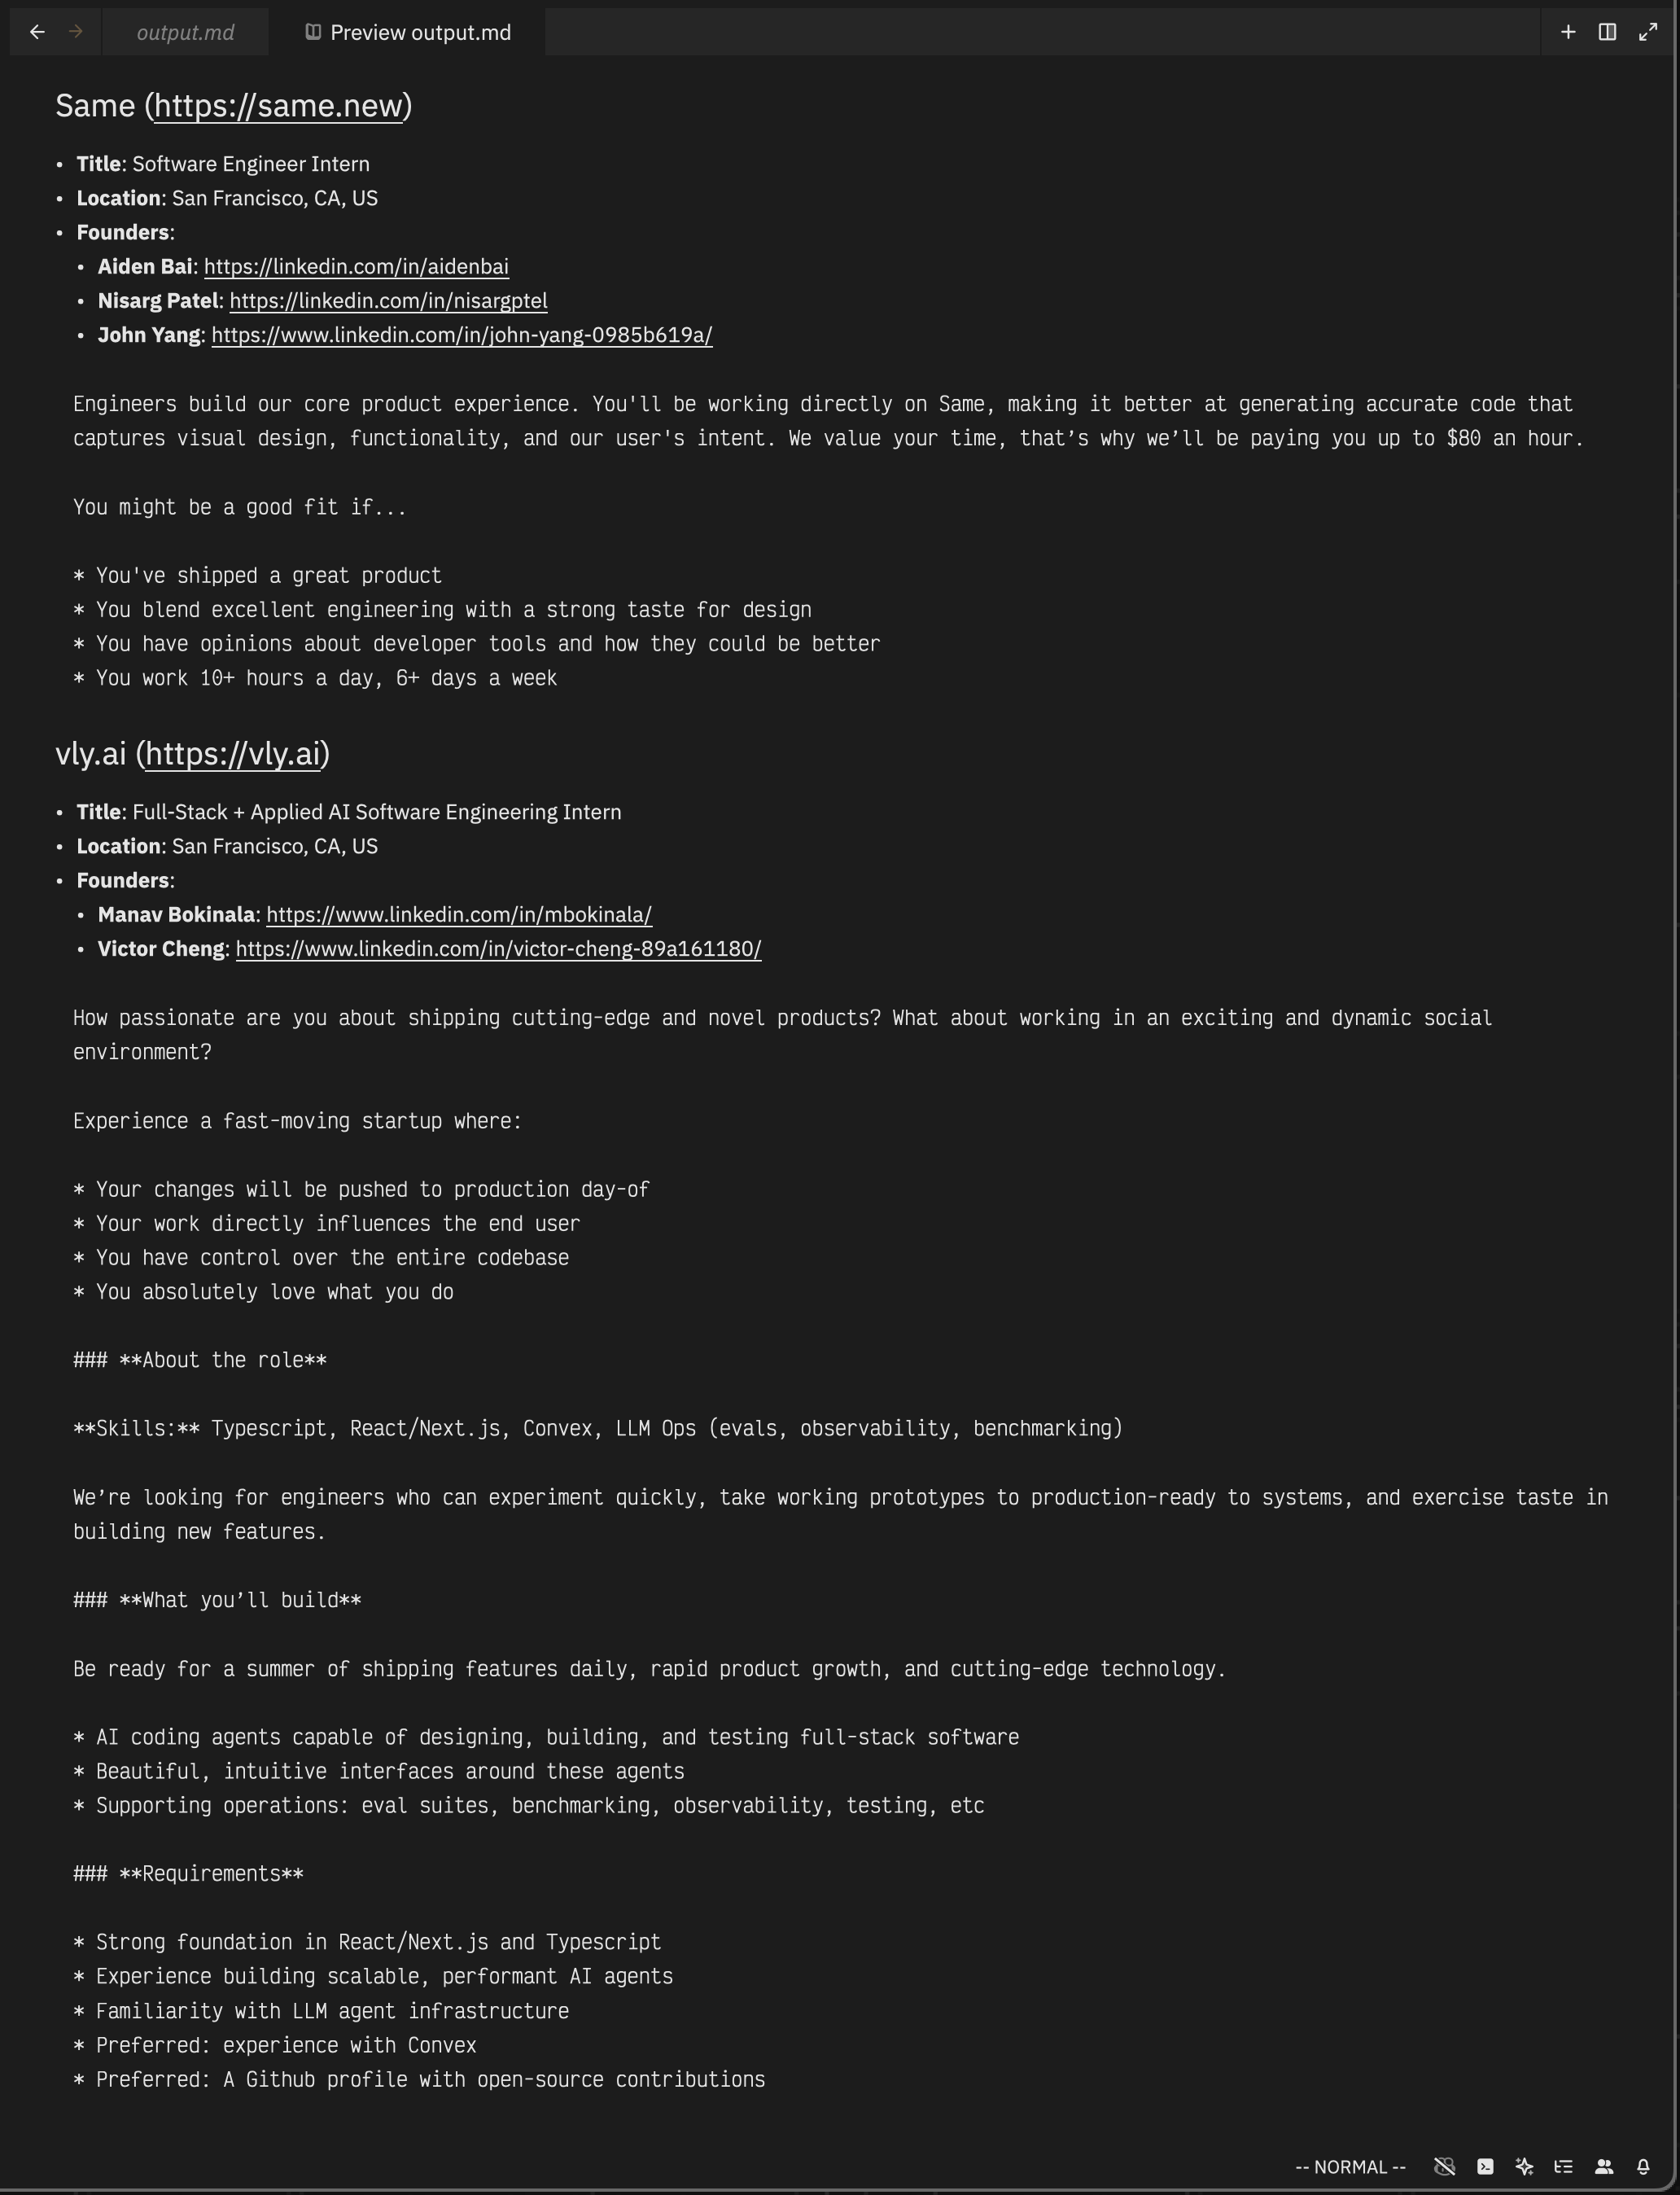
console.log(`Found ${hits.length} results!\n`);
console.log(OUTPUT);And giving this a run:
$ bun run src/index.ts

Found 22 results!

## Same (https://same.new)

- **Title**: Software Engineer Intern
- **Location**: San Francisco, CA, US

## vly.ai (https://vly.ai)

- **Title**: Full-Stack + Applied AI Software Engineering Intern
- **Location**: San Francisco, CA, US

[...]
Profit! $$$ You can find the full code for this demo on my Github!
We could just stop here – there are a couple more properties to query and from there you could use this API alone to generate leads on companies – but let’s take this a step further.
Step 4: Getting LinkedIn Profiles
Why? Because we can 😎
Remember how I mentioned that there were two routes of interest? One took us to Algolia, and the other does something with companies? Here’s the route to jog your memory: https://workatastartup.com/companies/fetch.
Let’s open up DevTools again and see what’s going on here.
Why, hello there @aidenybai! This endpoint seems to send over a bunch of data that fuels the “View job” page. Here’s the catch though: sending a POST request to that endpoint without a valid CSRF token fails with a 422 error. Looks like we’ll need to solve that next.
Step 5: Getting Around CSRF
Cross-site request forgery (CSRF) is an attack where unsuspecting victims who are logged into a service are made to submit a malicious request. This can happen a number of ways: clicking on a link sent via email, direct messages, even an <img> or <iframe> tag embedded in content.
After receiving the 422, I inspected the initiator of the request in DevTools to trace it back to a minified JavaScript bundle. That script was likely handling session verification and token refresh, exactly what I needed. I copied the relevant chunk and pasted it into ChatGPT to help me make sense of the minified logic.
With some back-and-forth, I was able to reverse the logic that fetches the CSRF token from a meta tag and uses it in subsequent headers. Turns out, a valid session cookie and that token in the X-CSRF-Token header are enough to pass validation.
The pattern is known as the synchronizer-token pattern. In a server-rendered website, the server is able to generate a secret value and embed it into the HTML content. Scripts and forms then send this value along with their request and the server validates the token, confirming it came from a user-initiated request in the browser.
For example, at the top of Work at a Startup, you can find a <meta> tag that usually looks like this:
<meta name="csrf-token" content="MpJIX7UqDYpjEzLS3UsMOd54yHQtEP917GGJb9CDGZMK9LLTaOgS9qhtoWW2ueiqu_47uImkE2jBbd6PF9m1YQ">This method is great for preventing CSRF attacks, but for our case where we want to just automate sending requests, we can easily scrape out the value by fetching the contents of the page.
Step 6: Adding to the Current Script
At this point, I need to incorporate logic to:
- Fetch the main site to extract the CSRF token
- Reuse cookies from the session
- Handle token refresh when needed
The first step is rather easy:
export class WaaSClient {
  protected csrfToken = "";
  protected sessionToken = "";
}
Define a class so that we can properly encapsulate logic!
Next up:
async init() {
  const res = await fetch("https://www.workatastartup.com", {
    headers: { "User-Agent": "Mozilla/5.0" },
  });

  const html = await res.text();
  const $ = load(html);
  const token = $('meta[name="csrf-token"]').attr("content") ?? null;

  if (!token) {
    throw new Error("Could not get CSRF token!");
  }

  this.csrfToken = token;

  const setCookie = res.headers.getSetCookie?.() ?? [];
  const bfCookie = setCookie.find((c) => c.startsWith("_bf_session_key="));
  if (bfCookie) {
    this.sessionToken = bfCookie;
  }
}
As you may infer, this function simply fetches the homepage of Work at a Startup and uses cheerio to parse the HTML content and get the contents of a specific element. It also saves the contents of the “Set-Cookie” header so we can reuse that session. We now have all the items we need to automate sending requests to Work at a Startup!
Just for our convenience, let’s write a method to refresh that CSRF token should it get invalidated after some time:
async refreshCSRF() {
  const res = await fetch("https://www.workatastartup.com/verify-session", {
    method: "POST",
    headers: {
	  "User-Agent": "Mozilla/5.0",
	  "X-CSRF-Token": this.csrfToken,
	  Cookie: this.sessionToken,
    },
  });

  const token = res.status === 422 ? (await res.text()).trim() : null;

  if (!token) {
    throw new Error("Could not get CSRF token!");
  }

  this.csrfToken = token;
}
From here, we can implement the last bit of functionality:
async fetch(path: string, init: RequestInit) {
let res = await fetch(`https://www.workatastartup.com${path}`, {
...init,
headers: {
"User-Agent": "Mozilla/5.0",
"X-CSRF-Token": this.csrfToken,
"Content-Type": "application/json",
Cookie: this.sessionToken,
},
});
if (res.status === 422) {
await this.refreshCSRF();
res = await fetch(`https://www.workatastartup.com${path}`, {
...init,
headers: {
"User-Agent": "Mozilla/5.0",
"X-CSRF-Token": this.csrfToken,
"Content-Type": "application/json",
Cookie: this.sessionToken,
},
});
}
return res;
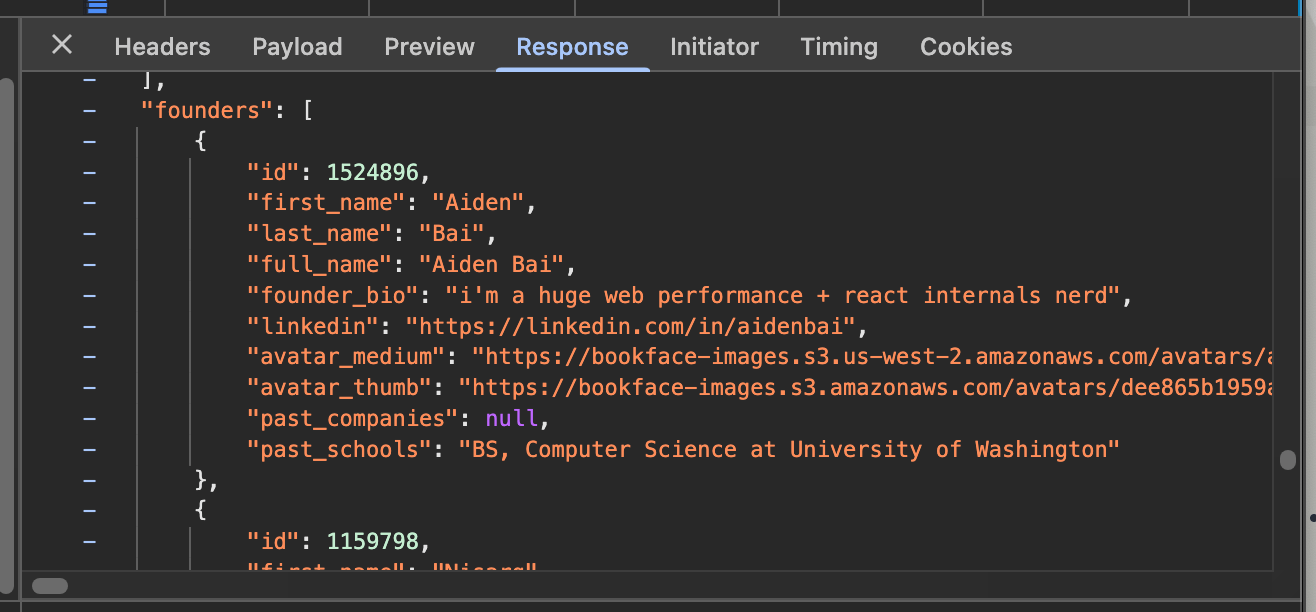
}And this now makes it possible to query the /companies/fetch endpoint with a list of company IDs obtained from Algolia and receive full company data including descriptions, verticals, job roles, and information about the hiring manager and founders!
Once all that was wired up to my previous code, my script could output a fully enriched internship lead list in Markdown.
Conclusion
I’m not going to lie, I went through this whole endeavor just because I didn’t feel like using Selenium. There are already too many scrapers and things out there in the world, and they use way too many resources. A simple, lightweight request system can be so much more useful for extracting structured data that you can then pass into whatever agentic system (I know I’m going to be doing more automation around this hehe).
And honestly, this is a lot of fun ;)
If you’d like to try it yourself or contribute, the code is live here: https://github.com/rayhanadev/yc-waas-api. Cheers!